Raspberry pi セットアップその3 Apache2のインストールと設定
※全般的なことは公式サイトのFAQを参照。
1. Apache2のインストール
Debian系でのパッケージ名は Apache2です。下記コマンドでインストールします。
[root@limau]:~# apt-get -y install apache2
2. Apache2の全体設定
Debian系は全体設定が /etc/apache2/apache2.confに書かれています。
[root@limau]:~# vi /etc/apache2/apache2.conf
Global configuratiion内、Server rootのコメントアウトをはずします。
ServerRoot "/etc/apache2"
Server Nameとポート番号を追記します。
ServerName limau.zenmai.org:80
cgi, ssiを使用できるようにし、 index.shtml index.cgi index.plをインデックスとして使用できるよう下記を追加します。
AddType text/html .shtml
AddHandler server-parsed .shtml
AddHandler cgi-script .cgi .pl
DirectoryIndex index.html index.shtml index.cgi index.pl
Debian系特有の構造で、Apacheで使用できるモジュールは /etc/apache2/mods-availableに置かれており、/etc/apache2/mods-enabledへシンボリックリンクを貼ることで有効化しています。手動でリンクを貼ってもかまいませんが、専用のコマンドがあるのでそれを使って Include(SSIの実行)とcgid(CGIの実行)を有効にします。
[root@limau]:~# a2enmod include
Enabling module include.
To activate the new configuration, you need to run:
service apache2 restart[root@limau]:~# a2enmod cgid
Enabling module cgid.
To activate the new configuration, you need to run:
service apache2 restart
再起動すると SSIが有効になりますが、そのついでに自動起動の設定を変更します。Debianではデフォルトの runlevelは 2となっており、/etc/rc2.dに init.dからのリンクを貼って自動実行しています。Apache2はインストール時に S02apache2として /etc/rc2.dに登録されていますが、そんなに早く起動する必要はないし、あとで logの書き出し先を RAM diskにするなどの小細工をしたいので実行順を2番から20番へと変更しておきます。
[root@limau]:~# cd /etc/rc2.d
[root@limau]:~# ls
K01lightdm@ S01ifplugd@ S02apache2@ S03rsync@
K05nfs-common@ S01motd@ S03cron@ S03ssh@
K05rpcbind@ S01rsyslog@ S03dbus@ S05plymouth@
README S01sudo@ S03dphys-swapfile@ S05rc.local@
S01bootlogs@ S01triggerhappy@ S03ntp@ S05rmnologin@[root@limau]:~# mv S02apache2 S20apache2
[root@limau]:~# ls
K01lightdm@ S01ifplugd@ S03cron@ S03ssh@
K05nfs-common@ S01motd@ S03dbus@ S05plymouth@
K05rpcbind@ S01rsyslog@ S03dphys-swapfile@ S05rc.local@
README S01sudo@ S03ntp@ S05rmnologin@
S01bootlogs@ S01triggerhappy@ S03rsync@ S20apache2@
(しかしなんでこんなにキツキツの起動順になっているのか理解に苦しむ)
3. サイト設定
Debian系では /etc/apache2/sites-available/配下にディレクティブ設定を置き、/etc/apache2/sites-enabled/配下にそのシンボリックリンクを作ることでサイトを有効化します。初期状態で /etc/apache2/sites-available/defaultのリンクが /etc/apache2/sites-enabled/000-defaultとして作成されているので /etc/apache2/sites-available/defaultを書き換えます。
[root@limau]:~# vi etc/apache2/sites-available/default
NameVirtualhost 172.16.0.225:80
<virtualhost 172.16.0.225:80>
        ServerAdmin webmaster@zenmai.org
        DocumentRoot /html/www
        ServerName www.zenmai.org
        ServerAlias limau.zenmai.org www.zenmai.org

        <directory /html/www></directory>
                Options ExecCGI FollowSymLinks MultiViews +Includes
                AllowOverride None
                Order allow,deny
                allow from all


        ErrorLog ${APACHE_LOG_DIR}/error.log

        # Possible values include: debug, info, notice, warn, error, crit,
        # alert, emerg.
        LogLevel warn

        CustomLog ${APACHE_LOG_DIR}/access.log combined

</virtualhost>
指定した Document Rootを作成し、パーミッションを変更します。ふだん使いのアカウントも www-dataグループに追加します。
[root@limau]:/# mkdir -p /html/www
[root@limau]:/# chmod -c 775 /html/www
`/html/www’ のモードを 0755 (rwxr-xr-x) から 0775 (rwxrwxr-x) へ変更しました[root@limau]:/# chown -c www-data:www-data /html/www
`/html/www’ の所有者を root:root から www-data:www-data へ変更しました[root@limau]:/# usermod -a -G www-data username
4. コンテンツ作成と動作確認
動作確認のためにコンテンツを作成します。
[root@limau]:/# vi /html/wwww/index.shtml
SSIの動作確認ができるものを簡単に。
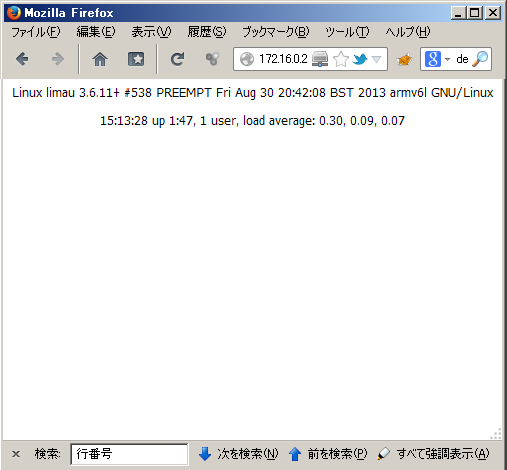
< !DOCTYPE HTML PUBLIC "-//W3C//DTD HTML 4.01 Transitional//EN">
<html lang="ja">
<body>

<p align="center"> <!--#exec cmd="uname -a"--> </p>
<p align="center"> <!--#exec cmd="uptime"--> </p>
</body>
</html>
apacheを再起動させ、他のPCからサイトを表示させてサーバ名や load averageが表示されればOKです。
[root@limau]:/# service apache2 restart
[….] Restarting web server: apache2[Tue Sep 24 15:12:55 2013] [warn] NameVirtualHost *:80 has no VirtualHosts
… waiting .[Tue Sep 24 15:12:57 2013] [warn] NameVirtualHost *:80 has no VirtualHosts
. ok
(warninが1件でていますが気にしないで続行。 *:80ってどこで定義されてるんだろう?)
このように表示されれば正常にSSIが動作しています。
次回はDNSサーバの設定をします